
Openpay has a special model for commercial partners, which allows the partner to create transactions on behalf of a merchant, without having the merchant share their Openpay access keys. Under this model, the merchant can decide when to restrict or allow a commercial partner in Openpay.
In order for a commercial partner to integrate to the Openpay platform, it is essential to understand the following topics:
To integrate a commercial parter into the platform, you need to go through the following steps
- Registering the commercial partner.
- Integrating the OAuth 2.0 protocol in the partner's application.
- Consuming the Openpay API services using the partner's credentials.
1. Registering the commercial partner.
As the first step, it is necessary to register the commercial partner in the Openpay platform. This process consists of submitting a registration form with information similar to the one required for the merchants. After filling and submitting this form, Openpay staff will validate the information, and if the information is correct a confirmation will be sent to your email, along with your partner identification codes.
To enter the registration form for testing click here ![]()
Once the testing registration form is submitted, the partner account will be automatically activated and an email with the required information for OAuth 2.0 integration will be sent.
The email sent to the partner will contain "client_id" and "client_secret" codes, which will identify the partner in the Openpay platform.
Note: After you successfully test your integration with the testing environment, you can register in production by clicking here ![]()
2. Integrating the OAuth 2.0 protocol in the partner's application.
The OAuth flow used by Openpay for the Partner model allows a Merchant to authorize securely a commercial partner to create transactions in Openpay on their behalf, using the partner's own keys.
The partner must implement the OAuth 2.0 standard in their web application in order to integrate their web application with Openpay. The following diagrams shows the two flows allowed by the Openpay model:
Flow 1 : When the Merchant already has an Openpay account, the following interactions take place between the Merchant, the Partner, and Openpay.

Flow 2: The following diagram shows the interaction between the Merchant, the Partner, and Openpay when the merchant sill hasn't registered in Openpay.
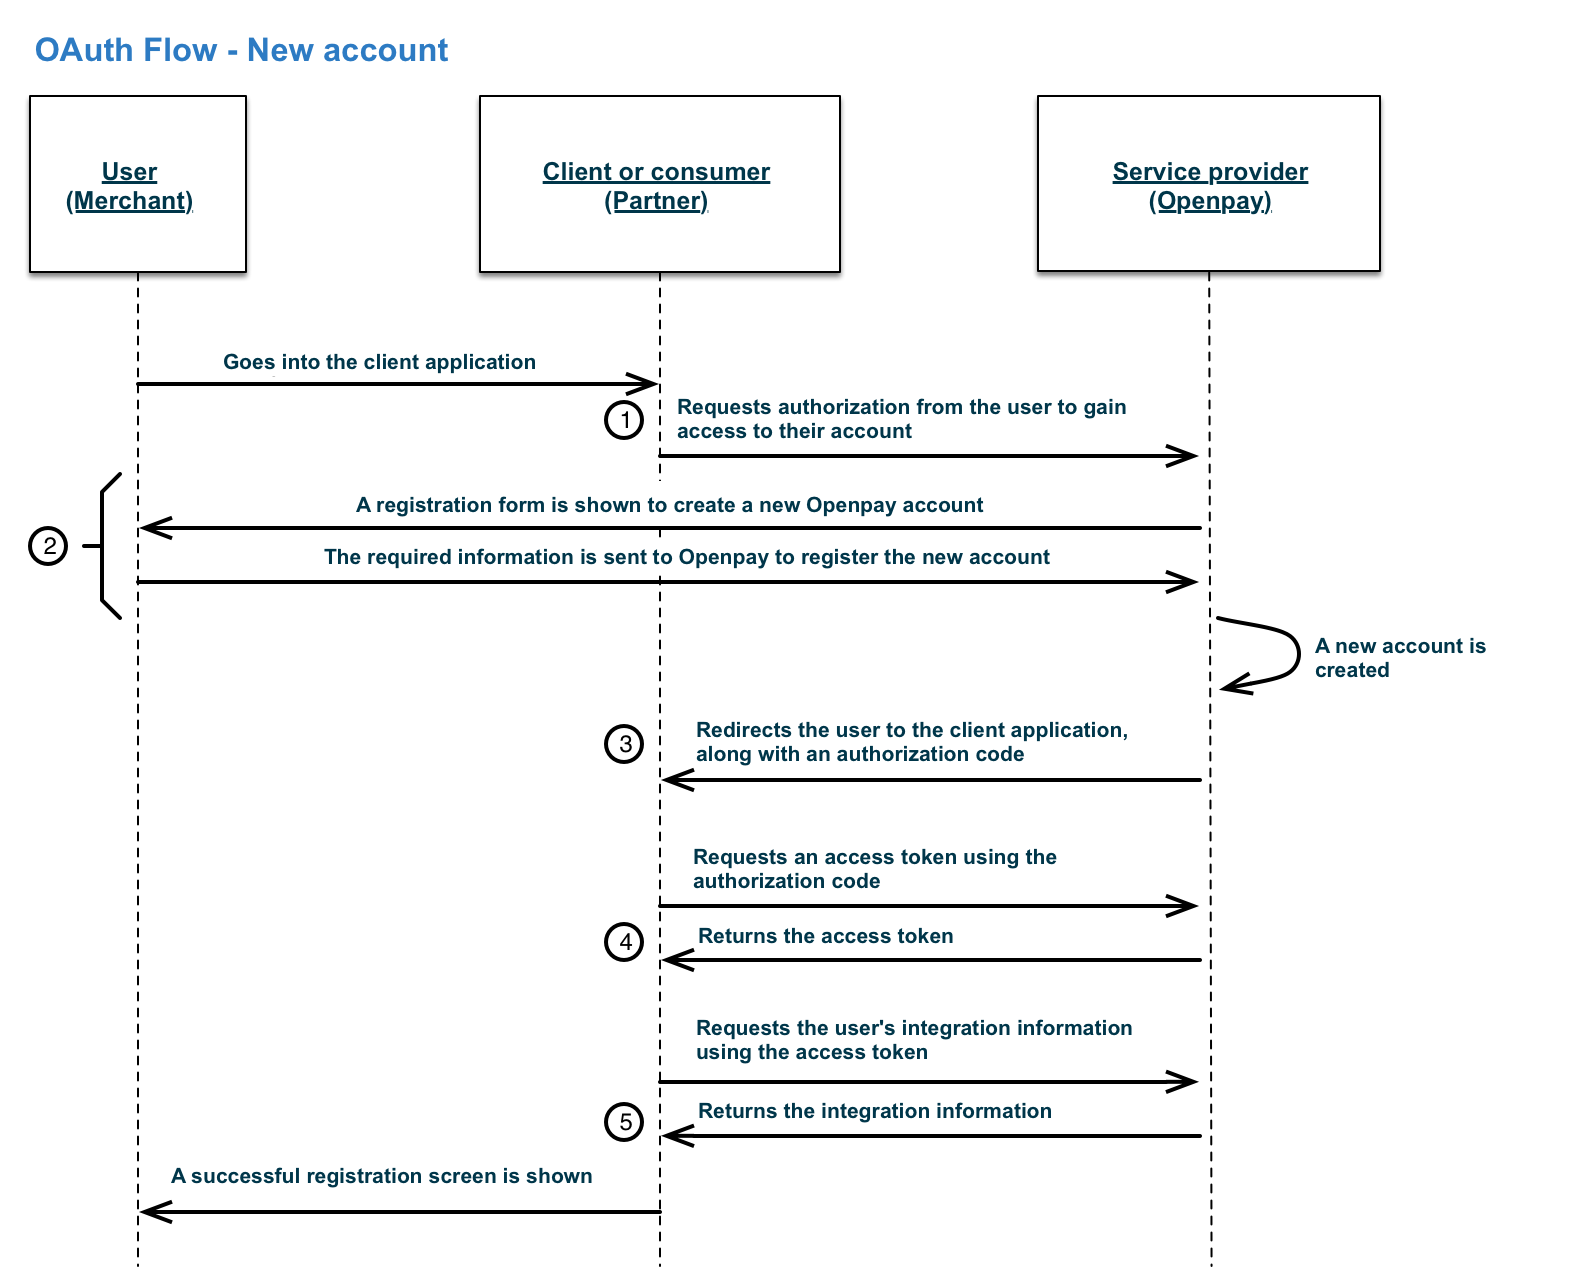
In both flows there are three different endpoints that should be consumed: One to request the Merchant's authorization, another to retrieve an access token, and a third one to retrieve the Merchant information.
OAuth Endpoints
https://sandbox-dashboard.openpay.mx/oauth/authorize: Allows the Merchant to grant permissions to the partner to create charges on behalf of the merchant.https://sandbox-dashboard.openpay.mx/oauth/token: Allows the Partner to obtain an access token.https://sandbox-dashboard.openpay.mx/oauth/merchant: Allows the Partner to retrieve the Merchant information in order to create transactions on their behalf.
Note: In order to use the production environment endpoints, you need to replace "sandbox-dashboard.openpay.mx" with "dashboard.openpay.mx" in all paths.
The interactions between the three entities during the OAuth flow can be summarized in 5 steps as follows:
1. Requesting access to the Merchant's account
The “Client" (Partner) must send an HTTP request to the “Service provider" (Openpay), requesting access to the Merchant's account. The service provider validates that the request is valid, and the “User" (Merchant) is redirected to a page hosted by the service provider, in which the Merchant can grant the requested authorizations in order for the Partner to create transactions on his behalf.
The Partner must provide a button so the Merchant can activate the feature to allow the Partner to process payments with Openpay. This button should call the Authorization URI.

The URI to call is explained next.
HTTP Request specification:
- It must be a GET request to the authorization URI
- The content type must be “text/html", "application/xhtml+xml", or "application/xml”
Syntax:
  https:///oauth/authorize?
  client_id=
  &redirect_uri=
  &response_type=code
  &scope=
Example:
  https://sandbox-dashboard.openpay.mx/oauth/authorize?
  client_id=ppk_xxxxxxxxxxxxxxxxxxxxxxxxxxxxxxxxx
  &redirect_uri=https%3a%2f%2flocalhost%3a8443%2fsitepartner%2fregisterok
  &response_type=code
  &scope=read+write
Where:
- client_id: Unique Partner identifier, sent by email to the Partner after completing their registration and being verified by Openpay staff.
- redirect_uri: URI to which the merchant will be redirected after they approve the Partner. This URL must match the URI given in the registration form, otherwise the approval will fail. Don't forget to URL encode this parameter in your request.
- response_type: Fixed value “code”. This indicates that an authorization code is expected to be returned after the merchant authorizes the Partner.
- scope: Fixed value “read+write”. Indicates the permissions that the Partner will have once they have access to the Merchant's information to create charges.
Note:
- The possible OAUth errors are described in the section “errores OAuth”
- In order to call the production environment URI, you need to replace "sandbox-dashboard.openpay.mx" with "dashboard.openpay.mx"
2. Authenticating the Merchant on the Openpay platform
The Merchant will have the possibility of creating a new account or using an existing one in Openpay. Either an explicit or implict authorization is required from the Merchant, for the Partner to be able to create charges on their behalf. Both cases are described next.
- The merchant creates a new account in OpenpayEl comercio al dar clic en el botón que provee el integrador desde su aplicativo, será enviado a una página dentro de la plataforma Openpay. El comercio selecciona “Nueva cuenta”, completa el formulario de registro y lo envía a Openpay.Openpay validará la información solicitada en el formulario, en caso de ser correctos estos datos personal de Openpay enviará un correo electrónico de confirmación. El correo recibido tendrá un botón para definir una contraseña y poder ingresar al portal WEB que provee Openpay para cualquier comercio.
Note:
- When a new Merchant account is created this way, the Partner will have an implicit authorization to charge on behalf of the Merchant.
- The Merchant uses an existing account in OpenpayEl comercio al dar clic en el botón que provee el integrador desde su aplicativo, será enviado a una página dentro de la plataforma Openpay. El comercio selecciona “Usar cuenta” e inicia sesión en Openpay.Como parte de la seguridad que provee este esquema de integración, al comercio se le mostrará una página de autorización para que explícitamente conceda al Integrador los permisos necesarios para que pueda realizar operaciones en su nombre.En caso de que el comercio no permita el acceso a su cuenta, el proveedor de servicios hará un redirect a la URI del Integrador, enviando como parámetros de respuesta en la URI:
- error: access_denied
- error_description: User+denied+access
Note:
- In the sandbox environment new merchants are automatically validated and receive a confirmation email immediately.
- When an existing account is used, the Partner must be granted authorization explicitly.
3. Receiving the authorization code
Once the service provider (Openpay) receives the request to grant authorization to the Partner, an authorization code will be generated, which will be sent to the Partner as a parameter in the redirect URI they provided.
The URI to which the Merchant is redirected is formed as follows:
Syntax:
https://?code=Example:
  https://www.sitepartner.mx/PartnerTest/home?
  code=769FkXdN7rAicf1l2dLUEeBLs53pgM
Where:
- redirect_uri: URI to which the merchant will be redirected to once he approves the Partner.
- code: Authorization code used by the Partner to obtain the access tokens.
Note: The authorization code returned to the Partner by Openpay must be stored, since this will be used to request future access tokens.
4. Requesting access tokens
Once the Partner has an authorization code, they must use it in a HTTP request in order to retrieve an access token from the service provider.
The URI used to retrieve the access token is explained next.
HTTP Request specification:
- It must be a GET request to the token URI
Syntax:
https:///oauth/token
  ?code=
  &client_id=
  &client_secret=
  &grant_type=authorization_code
  &redirect_uri=
Example:
  https://sandbox-dashboard.openpay.mx/oauth/token?
  code=769FkXdN7rAicf1l2dLUEeBLs53pgM
  &client_id=ppk_xxxxxxxxxxxxxxxxxxxxxxxxxxxxxxxx
  &client_secret=psk_xxxxxxxxxxxxxxxxxxxxxxxxxxxxxxxx
  &grant_type=authorization_code
  &redirect_uri=http%3A%2F%2Fwww.sitepartner.mx%2FPartnerTest%2Fhome
Where:
- code: Authorization code used by the Partner to obtain the access tokens.
- client_id: Unique identifier for the Partner, which was sent to their email after their registration and validation.
- client_secret: Secret key of the Partner, which was sent to their email after their registration and validation.
- grant_type: Fixed value “authorization_code”. Indicates the kind of request being made.
- redirect_uri: URI to which the merchant will be redirected after they approve the Partner. This URL must match the URI given in the registration form, otherwise the approval will fail. Don't forget to URL encode this parameter in your request.
The following is the response that the service provider will return to the Partner:
HTTP Response specification:
- Returned Content Type: “application/json”
- Response code: 200.
Syntax:
{
   "access_token":"<access_token>",
   "token_type":"<token_type>",
   "refresh_token":"<refresh_token>",
   "expires_in":<expires_in>,
   "scope":"<scope>"
}
Example:
{
   "access_token":"5abd52c7-c320-46ae-832b-d3a0108f3242",
   "token_type":"bearer",
   "refresh_token":"29439t39-51f1a-4f3a-9479-e58a873b4ad0",
   "expires_in":297,
   "scope":"read write"
}
Where:
- access_token: Access token used to consume the OAuth 2 services.
- token_type: Fixed value “bearer”. Token type.
- refresh_token: Token that can be used later to retrieve new access tokens. It must be stored securely, as if it were an user password.
- expires_in: Time to live of the access token, in seconds.
- scope: Indicates the permissions that were granted to the Partner to interact with Openpay.
Note:
- The possible OAUth errors are described in the section “errores OAuth”
5. Retrieving merchant information to connect to their account
As a last step, the partner must consume the Openpay service with OAuth 2 security that allows them to retrieve the merchant information. With this information the partner will be able to use the Openpay API, with the consideration that all operations will be name on behalf of the merchant.
The URI used to retrieve the access token is explained next.
HTTP Request specification:
- A GET request must be made to retrieve the merchant information
Syntax:
https:///oauth/merchant?access_token=Example:
  https://sandbox-dashboard.openpay.mx/oauth/merchant?
  access_token=e05fe2e3-6437-42e3-a82c-8c8131811b51
Where:
- access_token: Access token used to consume the OAuth 2 services.
Following is the HTTP response by the service provider to the Partner's request:
HTTP Response specification:
- Returned Content Type: “application/json”
- Response code: 200.
Syntax:
{
   "merchant_id":"<merchant_id>",
   "secret_key":"<secret_key>",
   "public_key":"<public_key>",
   "merchant_partner_status":"<merchant_partner_status>",
   "merchant_status":"<merchant_status>"
}
Example:
{
   "merchant_id":"xxxxxxxxxxxxxxxxxxxx",
   "secret_key":"sk_xxxxxxxxxxxxxxxxxxxxxxxxxxxxxxxx",
   "public_key":"pk_xxxxxxxxxxxxxxxxxxxxxxxxxxxxxxxx",
   "merchant_partner_status":"active",
   "merchant_status":"active"
}
Where:
- merchant_id: Openpay identifier for the merchant
- secret_key: Secret key used to call most of the Openpay API on behalf of the merchant.
- public_key: Public key used to create card tokens using the Openpay javascript library.
- merchant_partner_status: Current status of the Partner/Merchant relation.
- merchant_status: Current status of the merchant.
Note:
- To see a list of the possible OAuth errors see "OAuth errors”
- The access token used to retrieve the merchant information is valid only for five minutes.
- For information on how to use the Openpay API, refer to the guide "Card charges"
 or to the API documentation
3. Consume the Openpay API as a partner
From this point on the Partner will be able to use the Openpay services as specified in the "documentation", by using the keys retrieved in the previous step.
Any pair of keys provided to the Partner in the previous step will be able to do the following operations:
Ready!! Now you can start to integrate merchants into your platform and process charges through Openpay.
Errors in the authorization process
During the authentication process, if the URI is not formed correctly to request the merchant authorization to the service provider, an error page will be shown:
