
Charging a tokenized card
Everyone likes to receive payments, this is why we start with a tutorial to see how to do it.
This tutorial uses the Openpay.js, library to send the card information directly to Openpay. Using this library, besides being the easiest way to save a card, it minimizes the scope of a PCI Compliance certification.
To make a charge to a card we will do the following:

Steps:
- Antifraud system implementation to generate "device_session_id"
- Create a token of debit or credit card using Openpay.js
- Send charge information to your server
- Send a charge request to Openpay
- Openpay will sent a charge request to issuing bank and will answer
Creating Forms
We need to create a form to get the card information, saying the cards supported and the charge will be through Openpay.
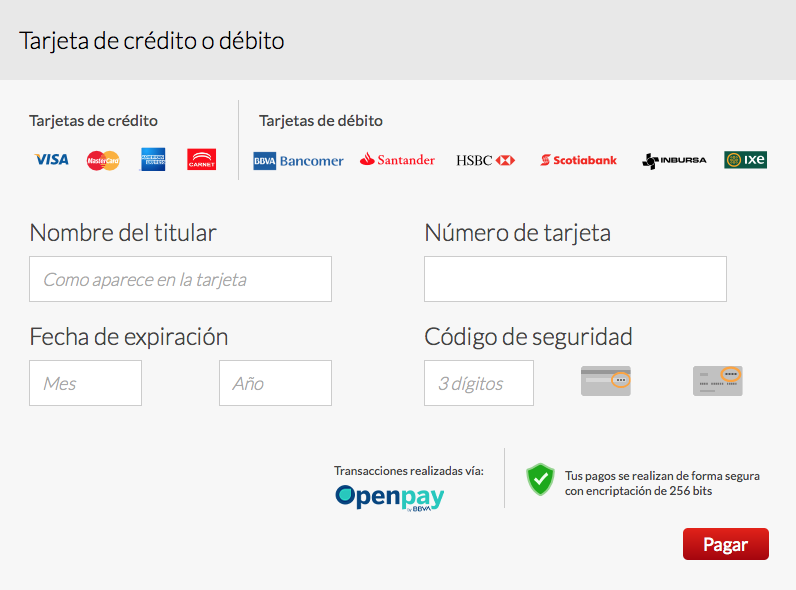
Code of the form.
Note: You can download the complete html here
<form action="#" method="POST" id="payment-form">
    <input type="hidden" name="token_id" id="token_id">
    <input type="hidden" name="use_card_points" id="use_card_points" value="false">
    <div class="pymnt-itm card active">
        <h2>Tarjeta de crédito o débito</h2>
        <div class="pymnt-cntnt">
            <div class="card-expl">
                <div class="credit"><h4>Credit Cards</h4></div>
                <div class="debit"><h4>Debit Cards</h4></div>
            </div>
            <div class="sctn-row">
                <div class="sctn-col l">
                    <label>Nombre del titular</label><input type="text" placeholder="Como aparece en la tarjeta" autocomplete="off" data-openpay-card="holder_name">
                </div>
                <div class="sctn-col">
                    <label>Número de tarjeta</label><input type="text" autocomplete="off" data-openpay-card="card_number"></div>
                </div>
                <div class="sctn-row">
                    <div class="sctn-col l">
                        <label>Fecha de expiración</label>
                        <div class="sctn-col half l"><input type="text" placeholder="Mes" data-openpay-card="expiration_month"></div>
                        <div class="sctn-col half l"><input type="text" placeholder="Año" data-openpay-card="expiration_year"></div>
                    </div>
                    <div class="sctn-col cvv"><label>Código de seguridad</label>
                        <div class="sctn-col half l"><input type="text" placeholder="3 dígitos" autocomplete="off" data-openpay-card="cvv2"></div>
                    </div>
                </div>
                <div class="openpay"><div class="logo">Transacciones realizadas vía:</div>
                <div class="shield">Tus pagos se realizan de forma segura con encriptación de 256 bits</div>
            </div>
            <div class="sctn-row">
                    <a class="button rght" id="pay-button">Pagar</a>
            </div>
        </div>
    </div>
</form>
It’s very important that the fields used to enter the card information have the data_openpay_card attribute because this allows the Openpay library to find the information.
Note that the attribute name isn’t being used to store the card information , this is because when you submit the form to your server the card info doesn’t travel in the request because it’s only used to create the token.
In the previous example form don't include the fields "amount" and "description" but should be included in the server submit.
Implementing antifraud system (Step 1)
Import libraries to generate device id as follows:
<head>
  <script type="text/javascript"
        src="https://ajax.googleapis.com/ajax/libs/jquery/1.11.0/jquery.min.js"></script>
  <script type="text/javascript"
        src="https://js.openpay.mx/openpay.v1.min.js"></script>
<script type='text/javascript'
  src="https://js.openpay.mx/openpay-data.v1.min.js"></script>
</head>
This way you can generate the device_session_id string:
<script type="text/javascript">
 $(document).ready(function() {
  OpenPay.setId('mzdtln0bmtms6o3kck8f');
  OpenPay.setApiKey('pk_f0660ad5a39f4912872e24a7a660370c');
  var deviceSessionId = OpenPay.deviceData.setup("payment-form", "deviceIdHiddenFieldName");
  });
</script>
Parameter payment-form, must store the form id which contains charge information to send. Say to he library this form contains the hidden field with the device_session_id.
Parameter deviceIdHiddenFieldName, needs the hidden field name than will store device_session_id. This field is important if you will need to recover the fiel value then send it with submit action.
Tokenizing and sending data (Steps 2 and 3)
Once we created our form, we will set up the send button to create a token using the Openpay.js.
First add the Openpay.js and JQuery files to the head:
<head>
  <script type="text/javascript"
        src="https://ajax.googleapis.com/ajax/libs/jquery/1.11.0/jquery.min.js"></script>
  <script type="text/javascript"
        src="https://js.openpay.mx/openpay.v1.min.js"></script>
</head>
Now let’s set the merchant-id and the public-key to the Openpay library:
<script type="text/javascript">
     $(document).ready(function() {
            OpenPay.setId('mzdtln0bmtms6o3kck8f');
            OpenPay.setApiKey('pk_f0660ad5a39f4912872e24a7a660370c');
            OpenPay.setSandboxMode(true);
    });
</script>
Finally we listen the clic event for "pay" button and change the submit action to make the card "tokenization":
$('#pay-button').on('click', function(event) {
       event.preventDefault();
       $("#pay-button").prop( "disabled", true);
       OpenPay.token.extractFormAndCreate('payment-form', success_callbak, error_callbak);
});
As you can see we are passing as a parameter the name of the form created, this is so the library gets the card information and makes the request to Openpay.
If everything works well, the method success_callback will be called to set the token id value token_id and the data will be sent to the server:
var success_callbak = function(response) {
              var token_id = response.data.id;
              $('#token_id').val(token_id);
              $('#payment-form').submit();
};
If there is a problem in the request, an alert will show the error:
var error_callbak = function(response) {
     var desc = response.data.description != undefined ?
        response.data.description : response.message;
     alert("ERROR [" + response.status + "] " + desc);
     $("#pay-button").prop("disabled", false);
};
For more reference about the library please go to the Openpay.js
Using reward points (Optional)
Optionally, we can accept payments using reward points, if the card supports them.
For this we add a modal dialog, which will allow the user to confirm the use of reward points for the charge. In this case, we will use a modal from the Bootstrap library:
<div class="modal fade" role="dialog" id="card-points-dialog">
  <div class="modal-dialog modal-sm">
    <div class="modal-content">
      <div class="modal-header">
        <h4 class="modal-title">Pagar con Puntos</h4>
      </div>
      <div class="modal-body">
        <p>¿Desea usar los puntos de su tarjeta para realizar este pago?</p>
      </div>
      <div class="modal-footer">
        <button type="button" class="btn btn-default" data-dismiss="modal" id="points-no-button">No</button>
        <button type="button" class="btn btn-primary" data-dismiss="modal" id="points-yes-button">Yes</button>
      </div>
    </div>
  </div>
</div>
Now with the modal HTML code, we modify the function success_callback we previously defined, so it shows the modal dialog if the card supports reward points:
var success_callbak = function(response) {
              var token_id = response.data.id;
              $('#token_id').val(token_id);
              if (response.data.card.points_card) {
                  // Si la tarjeta permite usar puntos, mostrar el cuadro de diálogo
                  $("#card-points-dialog").modal("show");
              } else {
                  // De otra forma, realizar el pago inmediatamente
                  $('#payment-form').submit();
              }
};
Now we will attach events to the modal's buttons in order to change the value of the hidden field use_card_points, and then send the payment request to the server:
$("#points-yes-button").on('click', function(){
              $('#use_card_points').val('true');
              $('#payment-form').submit();
});$("#points-no-button").on('click', function(){
$('#use_card_points').val('false');
$('#payment-form').submit();
});Notes:
- If the charge uses reward points, the server response may contain a message to be shown to the customer. In this case, it is required to display it in the purchase ticket. See the API definition for more details.
Create a charge (Step 4 and 5)
Now you only have to make the charge from your server, for this we’ll create an Openpay instance with the merchant-id and private-key parameters and then use the form values to make the charge:
$openpay = Openpay::getInstance('mzdtln0bmtms6o3kck8f',
  'sk_e568c42a6c384b7ab02cd47d2e407cab');

$customer = array(
     'name' => $_POST["name"],
     'last_name' => $_POST["last_name"],
     'phone_number' => $_POST["phone_number"],
     'email' => $_POST["email"],);

$chargeData = array(
    'method' => 'card',
    'source_id' => $_POST["token_id"],
    'amount' => $_POST["amount"], // formato númerico con hasta dos dígitos decimales.
    'description' => $_POST["description"],
    'use_card_points' => $_POST["use_card_points"], // Opcional, si estamos usando puntos
    'device_session_id' => $_POST["deviceIdHiddenFieldName"],
    'customer' => $customer
    );

$charge = $openpay->charges->create($chargeData);
Ready!! We have created a card charge.
If there is an error we will receive an exception which we must capture and handle, for more information consult the errors section
Notes:
- The fields amount, description, etc.. that not are presents in the example form, are data of your aplication an should be obtain before of the payment form.
- In the amount field, a string with decimal point format could be used.
- If you want to know how to do this process in a different language, please go to the integration section..
- The full HTML code is here. (The page does not work completely, you must download and make the POST page implementation on your server)..
- Make sure your integration meets version compatibility requirements see details
- You can simulate different results using the cards Testing
- Implement the Notifications to know the status of payments in real time
